onsdag 31 maj 2017

Fins

We have now implemented fins which will be the last thing we add to our fur shader before we hand in our project tonight. There is definitely some room for improvement regarding the fins (and other aspects of the fur shader as well) but we are very happy with what we have accomplished in this project. Here is what our fur looks like now:
Fins are often added as a complement to shells in fur rendering. As we have mentioned before, shells are just layers of dots which, from most angles, create the illusion of coherent strands of hairs. Viewed from low angels, however, the separate layers can be seen and this can create some unwanted effects. The fins are therefore drawn around the silhouette of the piglet to cover up those areas. 
As you may see, our fins aren't actually drawn on the entire silhouette. Normally, you would find edges between two faces where one is facing towards the viewer and the other is facing away. However, this requires a way to send not just single triangles to the geometry shader, but also their adjacent neighbors. In order to do this we would have to restructure our model loader extensively but since model loading would be an entire project in itself, we decided not to spend more time on that. Instead, we just find faces with normal vectors that are almost perpendicular to the vector between the face and the viewer, or faces that are viewed almost straight from the side. This works pretty well but it's not a perfect solution.

Just like with the shells, the texture for the fins are completely code generated. We just need a hair density and a base color and we then draw hairs with random positions, random lengths, random color (close to the base color) and random curves. This slight curving is pretty nice because it makes the piglet look a bit fuzzier, especially viewed from a distance. Here is a gif of the pig with fins turned on and off to make the difference more obvious.


söndag 21 maj 2017

Fur lighting

Today we worked a little bit on the lighting of the fur. This wasn't very hard. We just moved the code that we already had so that it affects the fur rather than the skin under the fur.


We have noticed that the fur that looks good close up doesn't look very interesting from a distance. You don't really get the cartoonish furry effect that we were hoping for. Thankfully there are some parameters that can be changed to make this better.

Here we have thin strands with a high density of hairs (like in the previous posts):
If we make the hairs thicker and more sparse the pig looks furrier from a distance, but it looks pretty horrible close up.
Hopefully this will get a little bit better when we add fins as well.

lördag 20 maj 2017

Fur displacement

Up until now, our hairs have just been pointing straight out from the piglet. We have now added three different types of displacement.
The first one is a slight curve downwards. This makes the hairs look less stiff.
The second is slight expansion of each scale as we move further out from the body. Hopefully, this will decrease the gap between the different triangular faces. To improve this, we should change the expansion depending on the angle to the adjacent face, but that's tricky to do since we don't have enough information in the geometry shader where we calculate the displacement. For now it's constant, which means that there is some overlap in some places while some gaps are still not filled. Still, it's an improvement.
The third displacement imitates a wind effect. For now it's just a sine wave but this could be expanded so that it gets input from the piglet's movement.


fredag 19 maj 2017

Fur coloring

Today we have been working on the coloring of our fur. First of all we wanted to improve the inter-fur shadowing to make the strands of hair look more natural and more separate. We tried a few different methods, but in the end we favored something similar to what we had before: a simple linear interpolation between black at the bottom layer and the original fur color on the top layer.
We did notice that the edges between the triangular faces become very obvious when we make the fur more dense. This is probably something we should look into. (Update: we have now made the faces a little bit bigger for each shell as a temporary improvement. As we work on the bend of the hairs, we will look into this in more detail.)

The next thing we added was a slight variation between the colors of each strand of hair. 
This makes the hair look more natural close up. Here we vary each of the RGB-values in the original color by +- 0.1. If we want to, we can also vary between all possible RGB-values.
We still haven't made the fur color change based on the lighting but that could be something to work on in the future.

torsdag 18 maj 2017

Textures

We have already made a huge improvement to our fur shader, simply by making the hair placement randomized.
Instead of calculating whether or not each fragment should be colored in the fragment shader, we now use a texture and apply that on the entire pig. By using a texture, we can make sure that the same dots get colored in on each shell (this is what creates the illusion of cohesive strands of hair), but we only have to make the calculations once. 
To do this, we had to add support for textures to our program. Funnily enough, we haven't implemented support for loading textures from images, the way textures are often used. For that we would have to import a library that can translate an image file to an array of numbers. What we do now is simply generate that list of numbers ourselves. Right now, our fur texture only stores opacities (which should be 1 for the hairy spots or 0 for the non-hairy spots) and we use a random function to determine the spots on the texture that become colored in. 
By using the same seed for our random function but taking fewer values, we get a second texture that has fewer hairs than the first one but all in the same positions as the first. By using the denser texture on the shells close to the body, and the sparser one further out, we create an effect of having hairs of different lengths. Since we haven't worked on lighting and varying the colors between the strands of hair, this is difficult to see right now. From the side, however, you can see that there are two distinct layers to the fur. We plan to add more soon. By using several different densities that get successively lower further out from the body, we can achieve quite natural looking fur. 

Today's bonus picture is from when we first started experimenting with code-generated textures and accidentally gave our piglet shoes and pants.

tisdag 16 maj 2017

Early fur

This week we have been struggling a bit but we now have a very early version of a fur shader!
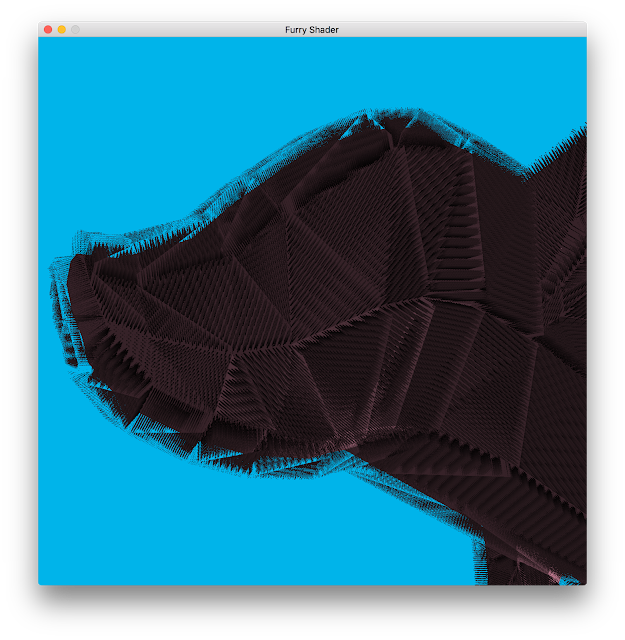
We are aware that this fur is extremely underwhelming. We also realized that the low-poly style might not be the most appropriate for a fur shader. However, this feels like quite an accomplishment given the amount of debugging that it took to reach this point. It originally seemed like the geometry shader's work disrupted the depth buffer. This made it look like the light travelled between the pig's skin and its fur. This can be seen in the nacho shield image in the previous post. The bug also made fur from the other side of the body appear in some spots. It was all very weird. We eventually realized that we had forgotten to multiply our displacement vector by the projection and view matrices, meaning that it was in a different coordinate system. 
We are using the shells-method of generating fur. The idea is that, although each strand of fur looks like a solid line, it is actually lots of flat dots stacked on top of each other. This is clearer when viewed from the side.
For every triangle on the pig, the geometry shader outputs 30 triangles, each one moved slightly in the direction of the normal vector. The fragment shader then colors in the same dots on each layer. From most angles, each strands of hair looks like a single cohesive unit, yet this method is a lot more efficient than say, rendering each strand of hair as an individual shape. Viewed from low angles, however, the layers can be seen and it looks really bad. This is why we are also planning to add a second technique called fins. This means that we render fur along the silhouette of the pig to cover up the holes. 

Our first priority, though, is to make the shells a lot better. The spacing of the hairs is extremely temporary. We want to find some way to make it more random, yet somewhat evenly spaced. The strands should also have uneven lengths to look more natural. We also want the strands of hair to have a bit of sway, not pointing straight out as they do now. Finally, there should be some shadows on the individual strands of hair. We have simulated this by making the bottom layers darker than the outermost, but this can definitely be improved.

This week's bonus picture is a result from our debugging:

torsdag 4 maj 2017

Geometry Shader

Today we implemented a geometry shader. In the future, this is probably where the bulk of our fur shader will be contained. For now, we experimented with some very simple geometry shaders: one which draws the normal vectors of each vertex, and one which creates a nacho shield.

In these models we have connected two shader programs to the same model (the piglet). We first render our piglet with the normal shader which we haven't changed from the previous blog posts. We then render it again with the program that includes a geometry shader. In the second image, the geometry shader takes each triangle and moves it out a certain distance in the direction of the normal vector.